
Price often tests and retests key support and resistance levels, setting up high-probability trade opportunities. See how to anticipate retests, as well as determine when the key levels may finally be broken.
Have you ever looked at a chart and had the supply/demand levels just jump out at you with such clarity that you almost knew that price would turn there in the future?
With a bit of seat time watching the charts, this skill is easily developed. But have you ever wondered why price turns there in the future? There is a psychological reason for these most obvious of retests which I will discuss this week. In nearly every Online Trading Academy class that I teach, the question comes up as to why these levels work.
My simplistic explanation is as follows:
What do you do when you have a fond memory of something? I expect that you continue to do the same thing over and over again until it no longer produces a fond memory. If you are given a shortcut to a favorite destination that cuts your travel time in half, will you continue to take that shortcut again and again? Of course you will!
The same idea of the fond memory works in trading. If you made money on a trade at a certain level of supply and demand, would you do the same trade again at the same price in the future? Very likely!
In the following AUD/USD chart, I have highlighted one demand and one supply zone. A one-hour chart was used to fine tune the levels, but here they are displayed on a four-hour chart. At the point labeled "D1," we can assume that there were several traders who went long (bought to enter) in this yellow demand zone.
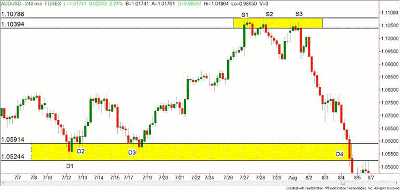
Click to Enlarge
At every subsequent retest of this level, the traders who had a fond memory of buying would continue to do the same trade at nearly the same price with the expectation that the few dozen to few hundred pips they made on the last trade would happen again.
Traders who bought again at D2 or D3 were taking the same "shortcut" because it continued to work! What about those who bought at D4? Yes, there was a small bounce there, but that shortcut didn’t work the last time. Can you see the subtle hint the market gave us that it was becoming less likely to work on the last retest?
NEXT: Signals That a Key Price Level May Not Hold
|pagebreak|Each later retest went deeper into the zone, giving us a clue that the willing buyers (demand) were drying up. Have you ever given thought to the people who went short (sold to enter) at D2? They may have considered the bounce at D2 as a location to enter a trend continuation trade. Obviously, a few candles later, they were not all that fond of entering the short trade at D2!
Click to Enlarge
Online Trading Academy students would have taken the small loss and moved on to the next trade. But what do many novice traders do? Hold on to the losing trade, with the hope that they will be able to get out at breakeven.
So the simplistic explanation is if you sold at D2, you would buy to close that position at D3, thankfully at breakeven!
So, now we have two groups of traders buying at D3: those who bought at D2 and want to make money again at that level, and those who sold at D2, just wanting to close their trade without taking a loss.
This is one of the reasons that re-tests work so well, but does every retest forever continue to work? Of course not. Remember to pay attention to the subtle clues the market is giving us about the depth of retracement into the zones.
Let’s take a look at the supply zone at the top of the chart. Notice the subtle difference between S2 and S3 in regards to how far into the supply zone they retested. The highs are getting lower! To me, this means that the supply zone is actually strengthening instead of weakening as we saw in the demand zone earlier. More and more people are taking the shortcut, and like it!
Of course, the same example we used earlier applies here as well: the short traders continued to sell at the supply zone, and the long traders who bought at S2 were unhappy at first, but got lucky and were able to sell at breakeven at point S3. Again, we have two different groups looking to sell at the same price: the fond-memory short traders, and the anxious novices who just want to get out at breakeven without taking a loss.
I want to point out something potentially very dangerous to your trading account. Your job is to take small losses and let your winners run, agreed? By looking at these previously mentioned examples, you might think that all you have to do is hold on long enough and you will be able to get out at breakeven. Sadly, this is not the case.
What about the latecomers who bought at S3 and decided to hold until breakeven? After a 1,000+ pip move against them, most would have probably blown up their trading account, or at least several weeks/months of good trading.
The only two things that successful traders have in common is that they cut their losses quickly, and they let their winners run. In nearly every article, this fundamental truth is hinted at, if not stated explicitly.
Be patient, wait for the low-risk/high-reward trades to come to you, and notice the subtle hints the market is giving you. Yes, it is that easy!
By Rick Wright, instructor, Online Trading Academy


