The Ichimoku Indicator allows you to glance at a chart to determine trend validity and where stops should be placed. The power of the indicator comes from the cloud, which strips charts of confusion and filters out low probability trades. Tyler Yell of DailyFX.com applied the Ichimoku to AUD/NZD to clear away a lot of the smoke, thus leaving a clear trade idea.
Many traders want to simplify their trading. Despite the lines that appear on the chart with the Ichimoku, there is a simple way to filter out good trend following opportunities from bad with this indicator. The Ichimoku is displaying a probable break lower in the AUD/NZD. This article will unpack that statement and show you a simple way to use Ichimoku, if you’re new.
AUD/NZD: The Fundamental Backstory
Last week was a big week for the New Zealand Dollar as the Reserve Bank of New Zealand stated in their eighth meeting of the year in no uncertain terms that things were heating up for the kiwi. The base line figure was that while prime interest rates were kept the same, they are targeting up to 3.0% growth over the next two years, which was higher than expectations. This is a rather large divergence as the JPY, EUR, and USD fight to weaken their currencies to stimulate growth.
This announcement sent the NZD higher across the board. Specifically, against the AUD, the kiwi hit a four-week high. This brings us to the trade highlighted by Ichimoku. Additionally, let’s walk through how you can use the Ichimoku to filter out low probability opportunities.
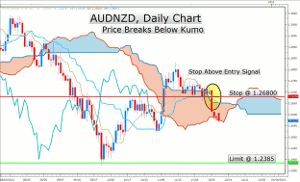
Ichimoku Applied in Full to AUD/NZD as Price Breaks Below Kumo or “Cloud”

(Created using FXCM’s Marketscope 2.0 charts)
Click
to Enlarge
Ichimoku Trade: Sell AUD/NZD @ Market
Stop @ 1.2680
Limit @ 1.2385
Ichimoku Trading Rules & an Ichimoku Tip
Using the Ichimoku Indicator, here are the rules we follow before entering a sell trade. The opposite will apply for buy trades:
- Price is below the Kumo Cloud (red / blue filled section on the chart)
(Price broke below Kumo on 12/10/2012) - The trigger line (tan) is below the base line (light blue) or has crossed below
(The highlighted oval shows the trigger and will be where our stop is placed) - Chikou line (Teal Green) is below price action from 26 periods ago
(The dark blue line is breaking through and could see open chart ahead, which is good) - Kumo ahead of price is falling (displayed as falling top line)
- Entry price is not more than 150 pips away from the Tenkan Sen/trigger line as it will likely whip back to the line if we enter on an extended move.
(Current entry price and bottom of cloud is 70 pips below the signal line)
NEXT PAGE: Cloud Gives Clear Support & Resistance Levels |pagebreak|
Filtering Opportunities by the Cloud Alone
Now that you know the entire trading system with the Ichimoku, here is a tip to help you take the #1 aspect of the indicator and separate it to filter out low probability trades. What you will do is take away the trigger line and base line, which are moving averages and the lagging line, which is simply the current price plotted roughly a month ago.
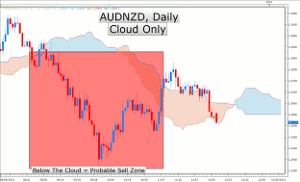
You will be left with the cloud alone to get a simple display of support and resistance with more leeway than a moving average.
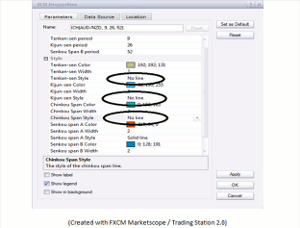
Adjusting the Indicator to Only See the Cloud
What you will do is go to the indicator and take off the three lines by marking them as ‘No Line’ and keep only the cloud. This will allow you to look and instantly see if price is consistently above, in between, or below the cloud.
Ichimoku Cloud Paves the Way for Support/Resistance Levels
The beauty of the cloud alone is that it forces you to give a little patience to price action corrections based on the width of the cloud. The reason for this infused patience is that there are two lines, which make up the cloud. The orange line is the average of the base and trigger line. The blue line of the cloud is the highest and lowest price of the last 52 days added together and divided by two. This is similar to the 50% retracement seen with the Fibonacci tool.
It is not uncommon to see price move through the first level before failing in the middle and resuming the trend. It’s key to watch price action for reversal signals in the cloud if you’re looking to jump into a trade. The thicker the cloud the more time price has to resume the original trend before breaking the prior trend or continuing the path it has been on.
Using the Cloud Alone Will Give You Clear Support and Resistance Levels.

(Created using FXCM’s Marketscope 2.0 charts)
Click
to Enlarge
If this is your first time using the Ichimoku indicator, this can greatly simplify your trading and identification of trend trading opportunities.
Here is Your Cheat Sheet for Using the Cloud Going Forward:
- Price Candles Above the Cloud: Uptrend and you can use the top of the cloud as the first level of support and the bottom as the second level of support.
- Price Candles Within the Cloud: Adjust current positions by taking profits, closing current trades that didn’t work out, or adding to a current trend.
- Price Candles Below the Cloud: Downtrend and you can use first line of the cloud as the initial level of resistance and the top of the cloud as the second level of resistance.
Last Tip When Trading the Ichimoku
Just because price is away from the cloud doesn’t mean the market is due for a snap back as you can see long-term trends carry forward smoothly with the cloud away from price.
Regardless of the set-up, we recommend keeping the trade size within your risk management rules. If you need assistance, you can find an easy formula here to customize your trade size.
By Tyler Yell, Trading Instructor, DailyFX.com


