
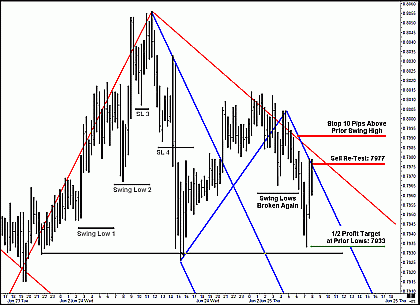
Once I am done with the euro FX chart, my intuition tells me to come back to take a quick look at the Australian dollar chart, and as you’ll see below, I find that price has plunged lower, nearly testing the major market structure of a prior major swing low and a smaller swing low. There are probably limit buy orders in this area, and you can see that though price tried to test and break through this area of support I marked with a horizontal line, it then bounced higher and is now testing the blue, down-sloping upper Median Line parallel. In fact, price has now tested this blue upper parallel twice. The latest bar left double tops, and after testing the upper parallel, it closed on its lows, a sign that the sellers were in control of this market.
Click to Enlarge
As I explain my thinking to the live audience, I am eyeing this chart with a trade plan in mind. I want to sell a re-test of the blue, down-sloping upper Median Line parallel, at .7977. My initial stop loss order will be ten pips above the prior swing high, at .7792.
Because I have to mark up charts in the commodities groups (copper, gold, lean hogs, oil, and soybeans) as well as the bond and stock index futures, I won't be able to monitor this trade moment to moment, so I'll set some money management rules accordingly and enter them into my trading platform:
- If my limit sell order at .7977 is executed, once I have 15 pips of profit in this trade, I will automatically move my initial stop loss order to a break even stop order.
- If my limit sell order at .7977 is executed, I will place a limit buy order for half the position five pips above the horizontal line I added on the chart as important support (and a few pips above the spike low several bars back) at .7933.
But what is a logical area to take profits on the second half of the position?
| More tomorrow in Part 4. | Read Part 1 | Read Part 2 | Read Part 4 | Read Part 5 |
Timothy Morge
timmorge@gmail.com
www.medianline.com
www.marketgeometry.com


