
Continuing our Elliott Wave series, I am going to be writing about the basics of Elliott Wave (EW). I want to keep this as simple as possible, because it is simple. The other objective I have for this series is to make it relevant to trading. This is not for the academician…this is for the trader.
I will examine how EW analysis can be used to project turning points in the market.
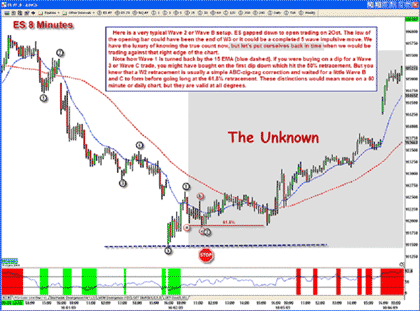
Entering a trade at the end of wave two, or B, is one of my favorite setups. Wave two and wave B are both corrective waves, and will therefore have the same structure. The only difference in the waves is whether they are part of an impulsive wave or a corrective wave. There are two hints that would give me an idea as to which wave I am looking at. First, I may be expecting a corrective wave because of the count preceding the setup. Secondly, if the wave that this countermove is correcting was three waves, then I expect that I am looking at wave B since wave one is always a five-wave structure. Sometimes the time frame is too large to see the wave structure.
Structure: Both W2 and Wave B are three-wave structures. Usually, they are a simple ABC correction. Sometimes the correction is so sharp that the structure is hard to visualize.
Retracement levels: 50%, 61.8%, and 78.6%. I emphasized the 61.8% retracement level because, in my experience, this level is the highest probability for a reversal. The other level I see reversing the market a lot is the 78.6% retracement, especially on shorter time-frame charts and lesser degree swings. When I say that I am buying on dips or selling on rallies, I will probably be using the 61.8% retracement level. Of course, as the market gets close to that level, I am looking for a completed pattern also (see chart below), and may have to go to a one-minute chart to verify pattern completion. I would not take a W2 or Wave B trade unless a minimum 50% retracement has been made.
Limited Capital Exposure: When a trade is made at the end of wave two or B, capital exposure is known. My stop is placed one tick (at most two in a volatile futures market) beyond the beginning of W1 or A. This was discussed in a previous lesson. Sometimes, if I see a close beyond the 78.6% retracement level, I will exit my trade because it is no longer a high-probability setup and the trend may continue. That's a judgment call.
W2/B Trade Setup: Here is a real example of a trade I remember taking. I remember almost being stopped out when I moved my stop to one tick below the W2, once I got profitable. I remember taking some profit at the 50 MA before moving my stop up. I was flat at the end of the day. Too bad! Look at that nice gap up the next day. But I'm almost always flat at the end of the day.
Click to Enlarge
My next lesson will discuss wave three.
By Dr. John Trapp of BostonWealth.net
Find out more about MortiES market thoughts at: http://www.bostonwealth.net/subscribe-to-morties-premium/


