
Here is an example of using the bar-by-bar method to read the market based on its own actions via the Wyckoff Method of market analysis. This example shows how to integrate background conditions and market structure, trend lines, multiple time frames, and the individual bars as it unfolds on the chart. This is from the S&P e-mini market on three- and 15-minute time frames. The method is applicable in any market on any time frame.
Background: Price rallied after the open and then spent an hour reacting in a slow drift down. Volume was less on the reaction than the volume on the rally off the morning lows (seen by the red line). Price bar ranges (the distance between the high and low of the bar) were also generally narrower on the reaction. As the reaction progressed, volume receded. A higher low (HL) was put in, and the market begins to rally.

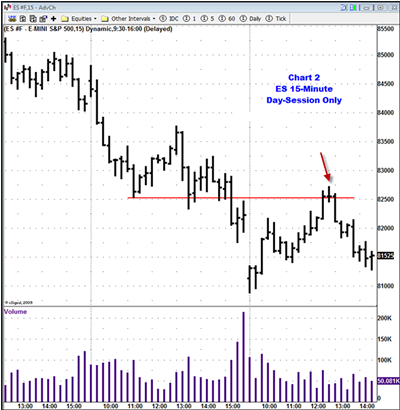
Click to Enlarge
Note the emphasis placed on the background. In this method, we always start with the background conditions.
A - Price pushes through the resistance area (red line) on high volume.
B - Next bar has sustained volume, but the range has narrowed and the close is in the middle— potential selling is coming into the market.
C - This bar is up, but the volume has dropped off precipitously. This tells us in advance that the supply line (ZZ), drawn as a parallel of line YY, is unlikely to be broken.
D - Supply enters at the oversold level of line ZZ where expected. Sellers came in at D and pushed the bar down, causing it to close on its lows on heavy volume. Bar D also closes at the same level as the close of the previous bar, showing no net progress on all that volume. This is weakness coming into the market.
E - An up bar, closing on its highs after dipping below D, indicates another rally will be attempted. However, the narrow range and low volume also indicate that buyers may have withdrawn, so we watch the next few bars closely.
F - Volume increases and the range widens a bit, showing activity at the top of the trend channel, but the result is a close on the lows. This is similar to bar D and indicates supply.
Click to Enlarge
Back to Chart 1:
G - The market reacts to the previous low at E and rallies, but the move up on G is on a comparatively narrow range bar with very low volume. Demand is lacking; buyers just aren’t interested in chasing prices higher.
H - Another bar similar to D and F that again indicates supply. Bar H closes near its low, below the close of G on an increase in volume. The market now starts to fall.
Good locations to initiate shorts were at the supply seen at F and H.
I - As the market falls, volume increases. This lets us know that selling is overcoming demand. Bar I closes on its lows. The increase in volume and poor close tells us in advance that the support levels from the trend line at YY and the horizontal support line (red line) are unlikely to hold.
J - Tells basically the same story as Bar I: Sellers are firmly in control (a down bar closing below the previous bar, an increase in volume, an increase in range, and it closes on its low) and price will likely break the support line and fall further.
K - The bar after J has narrow range, closed in the middle, and volume is high. The next bar closes a little higher. Some buying came in here, but K swamped whatever buying existed with a wider range down bar. Bar K closes below the previous two lows on an increase in volume, indicating significant supply remains present.
L - The swelling volume that came in between J and K knocked the market sideways to L. This often occurs after a few bars of high volume. The market needs to digest the recent events. Note the subsequent ranges and volume. Ranges are narrow and volume is low and receding as the market attempts to rally. The two bars immediately before L show little buying interest. The market has a lackluster rally into the morning session high (red line), which serves as resistance. We have seen Bar L before—it represents weakness similar to bars D, F, and H. This is another good location to initiate a short or to add to shorts taken earlier. The increase in volume and poor close triggers another round of selling. The last bar on the chart is widespread down bar with an increase in volume, closing on its lows. Supply is in full control.
This is an example of bar-by-bar reading of the market by its own actions via the Wyckoff Method of market analysis. It incorporates the all-important background conditions, multiple time frames, properly drawn trend lines, intraday support and resistance, and an understanding of how supply and demand—the activity of the sellers and buyers—reveals itself on the charts.
By Dr. Gary Dayton
You can learn more about the Wyckoff Method and other trading information at the author’s Web site: http://www.TradingPsychologyEdge.com.


