
I have zoomed in on this chart to make it easier to analyze the significant areas as well as show what entry setup pattern I have spotted. I have also marked in my limit sell entry order, as well as my initial stop loss order. Both will be entered on my electronic platform at the same time. Never trade without hard stops—stops protect your capital from ruin.
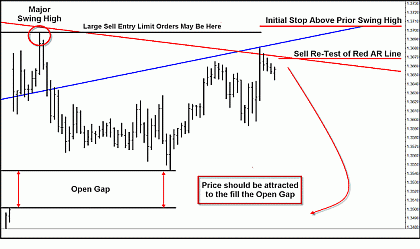
Click to Enlarge
Once again, looking at the chart, price retested the red, down-sloping Reaction Line. The Reaction Line acted as solid resistance, and note that price was unable to break above the prior swing high. Large traders are aware that markets tend to fill gaps and are looking for a relatively high-probability area to enter new short positions. On the test and retest of the red Reaction Line, I note that both tests were made with large range bars that closed with good separation below the Reaction Line. This is another clue that there may be a good amount of sell orders above the market.
Four bars after the retest of the red Reaction Line, I put my orders in the market. I'm risking 40 ticks, and even if price only makes it to the retest the top of the open gap, I should make 125 to 140 ticks of profit, giving me a potential risk reward of better than three to one.
Now that the orders are in the market, let's see what price does.
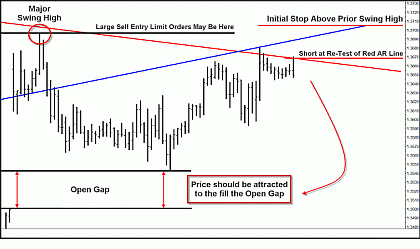
Click to Enlarge
Four or five bars later, price rallies and retests the red, down-sloping Reaction Line. My limit sell order is filled, so I'm short this market. I immediately check to make sure that my initial stop loss order is in the market and being worked on the exchange server.
Let's see how this trade plays out.
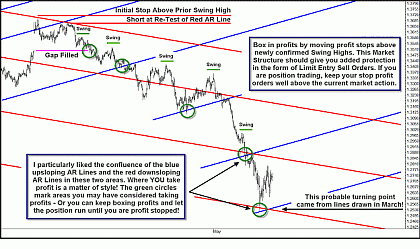
Click to Enlarge
You can see that once I was short this market, my initial stop loss order was never threatened; in fact, price never re-tested the red, down-sloping Reaction Line again.
Now it's a matter of style and money management. I marked five areas with circles that were potential profit targets. You could have taken profits as early as the area where price filled the gap, or you could have taken profits when price tested either the first or second up-sloping blue Reaction Line. Or you could have chosen to take profits at either of the two energy points where down-sloping and up-sloping Reaction Lines (opposing lines of force) met.
I also marked the new swing highs that were left as price continued to ratchet lower. If you are position trading, you can simply work lower and lower stop profit orders as price leaves new swing highs at lower and lower levels until you eventually get stopped out. If you followed this method strictly, you'd probably still be short the euro FX futures with a stop profit order above the prior swing high. This is called “boxing in profits” and is generally how I position trade, although I usually do have a logical profit target in mind—some significant level—in this case around the area of confluence or energy point just below 1.26 in the euro FX futures. (There are some major lows in the 1.25 to 1.27 area from March and April of 2009.)
Whether you are a physicist, an alchemist, a Greek or Egyptian God, or just simply a trader, it can all start with one simple line!
I wish you good trading!
By Timothy Morge
timothymorge@marketgeometry.com
www.marketgeometry.com


