
The following is a chapter from Michael Jardine’s book, New Frontiers in Fibonacci Trading:
The moving averages—which include both stochastics and the moving average convergence divergence indicator (MACD)—are lagging indicators and, as such, are open to whipsaws. Whipsaws occur when prices jump back and forth across the moving average, and trigger false trade entry signals before the moving average can catch up with the price action. However the moving average may also function as a leading indicator when used together with the Bollinger Band. Both are lagging indicators, but by combining them together, they become leading indicators.
This application was introduced to me by Russell A. Lockhart, PhD., though I have adapted it to my own trading style. I would encourage you to do exactly the same—take a look, see how it works, and then adapt it for your own use.
Bollinger Bands, developed by John Bollinger, are moving averages of the standard deviation of prices, over a given period of time. Standard deviation (SDV) is the square root of the variance, and variance is a measure of how spread out a distribution is. These calculations are performed for you in the majority of charting programs. The Bollinger Bands show you exactly what price level, based on prices up and down over a given time period, would be considered to be out of the ordinary if prices were to then reach or exceed that level.
The default setting that John Bollinger uses is a 20-period moving average, set to two standard deviations. Statisticians recognize that two standard deviations is the normal level of deviation for the majority of charting applications. So the more volatile the swing in prices, the wider the bands are likely to be. Likewise, the smaller the swings in prices, the narrower those bands are likely to be.
One way to use this information is to observe what happens when the bands tighten. That is usually a sign that prices are consolidating in an increasingly narrow range, thus setting up for a major breakout from the established trading range. The bands themselves have limitations in that they are not leading indicators, although there are techniques for using the information they reveal to help make trading decisions. For instance, the point at which prices touch the band is often the signal of an impending reversal, which would then be confirmed by subsequent price action.
The way we combine the moving average and Bollinger Bands is to modify both of them in such a way that their crossing becomes significant. To do this, we emphasize what the Bollinger Bands tell us: First we increase the volatility beyond two standard deviations by pumping it up to 2.23, a Fibonacci number. Then we shorten the moving average from 20 down to 13, the sixth number in the Fibonacci sequence. Why use 13? Because it fits the method much better than eight or 21. Of course, you can use a non-Fibonacci number such as 12, but be aware that 12 is the square root of 144, which is also a Fibonacci number!
Now let’s modify the moving average by pulling it back three time periods. Why three? Because it is a moving average of the immediately preceding three time periods, and we want that average shifted back to the beginning of the preliminary time period. This is necessary because we are not interested in where the moving average touches prices, but where it touches the Bollinger Bands.
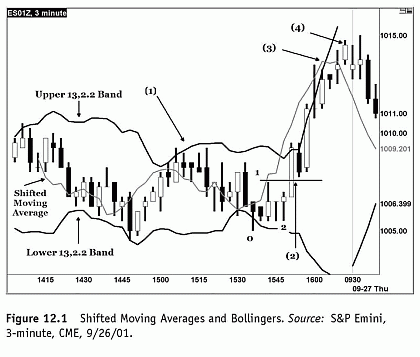
This setting aligns the shifted moving average (ShMA) correctly with the Extreme Bollinger Bands (EBB) so that when the ShMA crosses the EBB, it is a reliable signal for exiting the trade. Figure 12.1 shows the setup, with the indicated trade entry and exit points.
Article Continues on Page 2
|pagebreak|Candle (1) shows that the Bollinger Bands are narrowing; start to look for a major breakout of the trading range.
Candle (2) is a classic 123 reversal, with the entry point as shown. One candle after the entry, the ShMA crosses above the EBB. (It may look as if the ShMA crossed before trade entry, but remember we have shifted it back three candles, so that the point at which it actually crosses the band is three candles to the right.) At this point—when the ShMA crosses the EBB—you might decide to forgo the Fibonacci Growth Wave target and instead exit at the cross.
Candle (3) indicates the point where the ShMA crossed the upper EBB signifying the point to exit the trade.
Click to Enlarge
Candle (4) shows where the cross actually takes place—near the apex of the trade. Notice how this would have given you a much more profitable trade than simply exiting at the W3 target of 1.62, or exiting when prices touched the upper band.
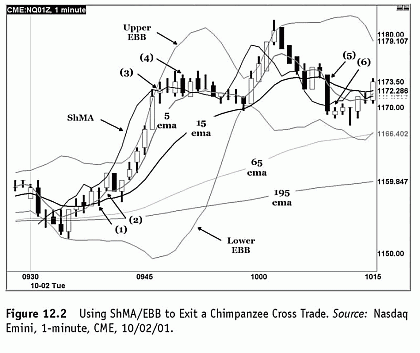
You can use this method with any of your normal trade entry techniques. It only becomes significant when the ShMA moves outside of the EBB, and then it is only useful as a signal to exit the trade. But when used in this manner, it can provide you with the ability to better pick the likely top of a price trend. Figure 12.2 shows an example of using the ShMA/EBB method to exit a trade on the Chimpanzee Cross.
Click to Enlarge
- 5 EMA crosses above the 15 EMA. (Note that 65 EMA is above the 195 EMA, so we would look for long trades.)
- Trade executes long one tick above the high of the previous candle (1) 1159.5.
- SHMA crosses the EBB . . .
- . . . at this point (remember it has been pulled back three candles). So the trade exits one tick below the low of this candle, 1171, for a gain of 10.5 points on the Nasdaq E-mini.
- The 5 EMA crosses back down below the 15 EMA after this candle has printed, so the traditional exit using the Chimpanzee Cross method would be one tick below this candle.
- Trade exits during the candle at 1168.5, for a gain of 9 points. In this example, the SHMA/EBB gave us a better exit.
Again, it is important to observe and compare the different methods to see if one has a clear advantage over the other, based on which financial instrument you are trading and on which time period.
By Michael Jardine, author, New Frontiers in Fibonacci Trading