
This free chapter comes from Mark Larson’s 12 Simple Technical Indicators That Really Work course book and DVD.
Chapter 4
Moving Average Convergence/Divergence (MACD)
The two technical indicators that I’m going to cover in the next two chapters—moving average convergence/divergence (MACD) and price rate of change (PRC)—have a 90% success rate. That is, when I can identify the exact crossing of these two indicators, I win 90% of the time.
I’ve been using MACD and PRC for many years now—and they have not led me wrong yet. I created these indicators after many years of trading in and teaching about the stock market.
I should mention that in your consideration of moving averages, you don’t necessarily have to see them cross (though it’s even more powerful if they do), but merely come together within a certain range.
At least two of the three should touch, and the third should be within an eighth of an inch of the other two. If they’re farther away from each other, the process doesn’t work as well. Remember, you don’t necessarily have to see moving averages cross, but merely move together and touch.
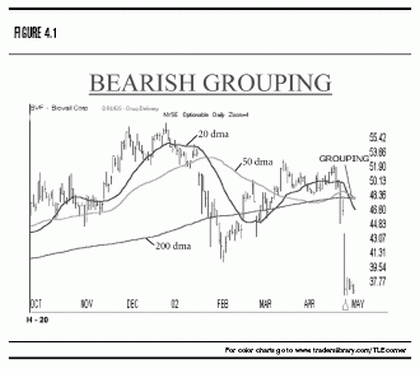
Look at what’s happening in Figure 4.1: The 50 displaced moving average (DMA), 200 DMA, and 20 DMA have touched. The 20-day moving average, which is a faster moving average than 50 and 200, indicates that we have a crossover as it breaks through the 50 DMA and 200 DMA.
At the time that they touch—right about $48—we don’t know the direction they’ll take. But I definitely would have considered this to be a bearish signal because we closed lower the next day and even had a gap down. In all reality, the 20 broke through the 50 and 200, with the latter being the strongest point of resistance.
Click to Enlarge
Click to Enlarge
NEXT: Discussing MACD in Greater Detail
|pagebreak|MACD in Detail
Let’s talk in a bit more depth about MACD, which again, stands for Moving Average Convergence/Divergence. It’s very similar to the price-moving averages, except that it uses three exponential moving averages instead of one or two. As I mentioned earlier, parameters make the biggest difference. You can adjust any one of the parameters to be zero or 100—the key is to insert the right number.
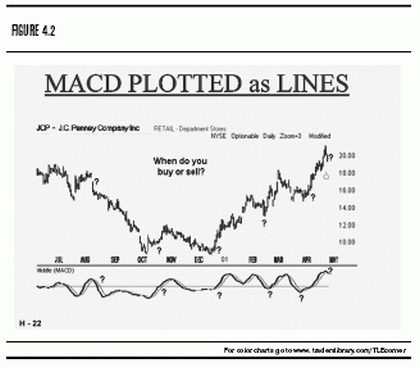
In Figure 4.2, you see the typical MACD, which is in the form of two lines. I inserted several question marks when I first tried to use this MACD about six years ago. I was confused about where to buy and sell, as I saw the stock crossover go up, but then ultimately go lower.
Click to Enlarge
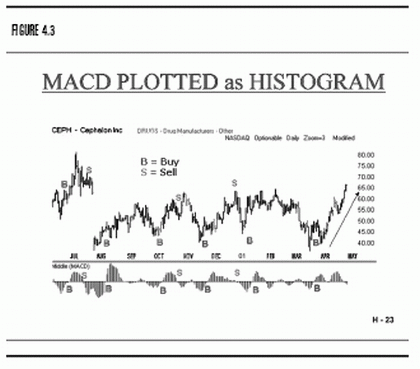
I now prefer using MACDs in a histogram form like the one shown in Figure 4.3 because I like to look for what I referred to before as a change of character.
Take a look at the B&S (buy and sell) in Figure 4.3. You see a change of character in which the stock comes straight up, so you buy. Later, you see change of character from the bullish to the bearish side, so you sell and make a good profit. Still later, you have yet another change of character. What you’re ultimately doing is adding more indicators to your tabs so you can decide whether you have more positive or negative indications on this trade.
Click to Enlarge
Chapter Summary
• MACD with PRC has a 90% success rate
• A stock’s moving averages should at least approach one another, if not cross, before you act on that stock
• MACDs rely on three exponential moving averages instead of one or two
• Look for patterns where the three moving averages come together closely
• Inserting the right number is essential to the process of determining a successful parameter
By Mark Larson, author, 12 Simple Technical Indicators That Really Work