
We continue our article series on Ichimoku analysis by studying “Kumo,” or “The Cloud,” and how price interaction with this clearly defined area can generate very strong buy or sell signals.
The part of Ichimoku that just absolutely jumps out at us when we apply it to our charts is the area known as “The Cloud” or “Kumo” in Japanese. It’s one of the areas of this indicator that makes the field of study so interesting. It’s constantly changing…in area and in width.
Kumo actually just consists of two lines. The area in between the two lines is shaded and it’s considered to be a moving range of support during uptrends—and resistance during downtrends. Many traders will look to Kumo when setting stops on trades that were initiated by the trigger/base line crossover.
One of the more important tasks with which Kumo can help traders lies in its ability to denote the trend of the currency pair.
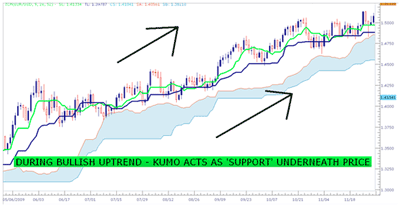
When a pair is trending up, making higher highs and higher lows, Kumo will function as support, sitting underneath price as the currency pair trades higher. By default, many charting platforms like Marketscope will print Kumo as blue during uptrends.
Click to Enlarge
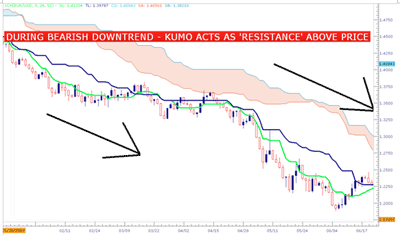
And when a pair is trending down, making lower highs and lower lows, Kumo will function as resistance residing above price as the currency pair heads lower. These periods will show Kumo printed as red on the chart by default (please see below).
Click to Enlarge
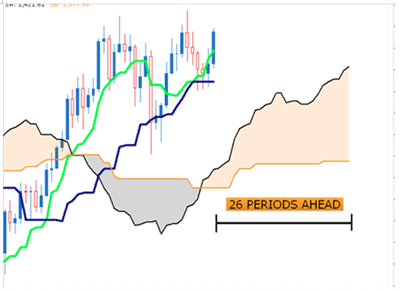
One of the more unique aspects about Kumo is that it’s built for 26 periods in advance. If you observe current price on any chart in Marketscope while Ichimoku is applied, you will notice that for 26 periods ahead, Kumo is already plotted and waiting for price.
However, keep in mind that most traders believe this has little forecasting value and instead should be used to simply gauge the overall strength of any trend.
Click to Enlarge
NEXT: Learn How to Use Kumo in Your Trading
|pagebreak|How to Interpret Kumo
Now that we know what Kumo is, let’s discuss how traders are using it.
One of the more valuable functions of Kumo is its ability to show traders the potential strength of the trigger/base line crossover. When this crossover occurs, traders will notice its location in regards to Kumo and grade the strength of the signal accordingly. Let’s walk through an example together.
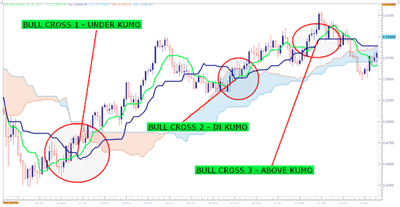
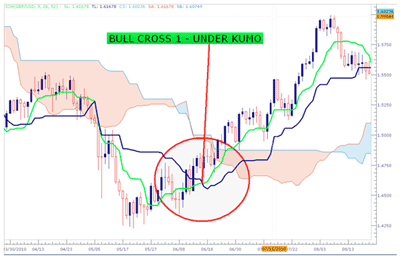
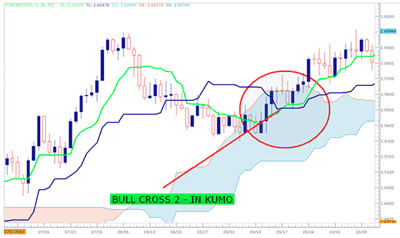
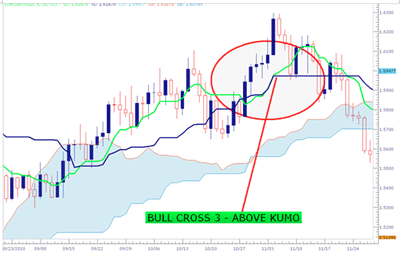
On the GBP/USD chart below, there are three bullish crossovers taking place, all of which are circled in red. Let’s walk through each of the signals to see the way that traders would generally interpret these crossovers.
Click to Enlarge
During bullish cross 1, notice that both price and the bullish crossover are below Kumo.
Click to Enlarge
When this crossover takes place, it is at the end of a downtrend that was previously bearish. Traders are unsure as to whether the trend is going to change to the upside, or if the bearish trend is going to prevail.
For this reason, traders will often consider this to be a weak signal. If the reversal does take place, the potential reward could be handsome; but reversals will not always take place. Observance of risk by setting a stop is extremely important for these signals.
During bullish cross 2, the crossover and price are residing in Kumo as the trigger crosses the base line.
Click to Enlarge
Traders will generally consider these trigger/base line crossovers taking place in between Kumo to be of moderate strength.
When bullish cross 3 takes place, with price and the trigger/base line crossover residing above Kumo, traders will generally look upon this signal as being very strong.
Click to Enlarge
The reason that traders will generally consider bullish cross 3 to be strong is because of agreement.
Remember, if price is above Kumo, traders look at the pair as being bullish. When the trigger line crosses up and over the base line (which is a bullish signal) and price is above Kumo (a bullish environment), traders will enter into long positions considering the trigger/base crossover signal to be very strong.
The exact opposite is true for short signals. Bearish crossovers taking place below Kumo are generally considered to be very strong, because, once again, we have that agreement.
Pricing below Kumo indicates bearishness, and a bearish crossover will offer the agreement that a trader would want to consider the signal very strong. Bearish crossovers taking place above Kumo would be looked at as being weak.
How to Use Signal Strength
Now that we know how to integrate Kumo when we receive a trigger/base crossover, let’s talk about one of the more popular ways that traders look to benefit from the strength of the signals produced by Ichimoku cloud analysis.
One very popular method of doing so involves the trade size. When a weak signal is generated, traders can potentially look to open a position for one lot.
When a moderate signal is generated, traders can look to open a trade for two lots.
When strong signals take place, traders can enter a position for three lots.
With this method, traders would be taking on larger trade sizes for signals that they felt were stronger.
Other traders may choose to take only the very strong signals that offer agreement (bullish crossovers above Kumo or bearish crossovers below).
Now that we know how to incorporate signal strength, we can manually backtest in the same manner we had done on the previous lesson by scrolling back in time on Marketscope, and scrolling forward one candle at a time to observe the way that the currency pair traded after receiving each of the signals outlined above.
In Part 3, we’ll talk about “Chinkou Span” and begin delving a little deeper into risk management while trading with Ichimoku clouds.
By James Stanley of DailyFX.com


