
Sam Evans shows FX-inspired examples of how carefully chosen indicators can help traders isolate only the highest-probability trade set-ups without overcomplicating their trading.
Free Webinar: Specific Tips for Trading in Choppy Markets. RSVP now.
Two weeks ago, I wrote about a powerful concept in trading which I have now begun to refer to as “The Silence Between the Notes.” I am referencing the times when FX traders decide not to take a trade, rather than being too eager to click buttons.
Let’s face it, the forex market is pretty much the largest arena on earth for people to trade, no matter the size of their positions or reason for taking part in the first place. For this reason alone, there are literally hundreds of potential trading opportunities on offer on a daily and weekly basis.
Newer traders should recognize that while this may sound like an attractive feature of FX trading, it can also become hazardous to take too many trades without the correct level of planning and discipline.
In addition to actually taking trades, passing on trades is part of the overall process of attaining and maintaining consistency in the markets. Remember that if we look at too many charts across too many time frames, there will always be a potential set-up in front of us.
See related: How to Overcome Overtrading
I often say to my students that in trading, the easiest thing to do is take an entry. We can easily click the buy or sell button with ease, but the question of whether or not that button click was a good thing is a whole other question itself.
In order to avoid this common scenario, I like to do what I call “filter” my trading opportunities on offer. In the ongoing XLT sessions I host, we carry out this process with a number of “odds enhancers,” which, in essence, look at various aspects of price structure and behavior and help us grade our trading opportunities accordingly.
There are now up to 12 of these odds enhancers used in the Online Trading Academy curriculum, all of which are based around the most important piece of technical analysis: price itself.
See related: It’s All About Supply and Demand
We often say in our classrooms and in the XLT, that if you know what to look for on a clean candlestick chart, it is almost like looking at price action through a set of 3D glasses. In my opinion, price itself will always be the most important piece of the decision process for any trader.
However, this does not mean that we choose to completely ignore the various technical indicators available to active traders and investors. In fact, if used in the correct manner, these tools can become powerful weapons when used as odds enhancers as well. I would stress, however, that if a technical indicator is something a trader is considering using in their trading activities, they should immediately recognize that they are most helpful when used as a decision-support tool, as opposed to a decision-making tool.
Far too many newer traders choose to rely too heavily on these technical tools to make their choices of buying and selling in the markets and fail to realize that any indicator, be it MACD, Stochastics, Bollinger bands, or even moving averages, will always be lagging indicators. They will only tell us what has already happened, or what is actually happening.
See related: There Is No “Holy Grail” Indicator
In the reality of market speculation, nothing out there will ever tell us exactly what is going to happen next. As objective, disciplined, and planning traders, we need to strive to make a decision on whether to take a trade or not based on completely unbiased analysis and what the market itself is showing us; nothing more, nothing less.
When this concept is fully understood and a rule-based core strategy has been developed, we can then choose to embrace one or two technical indicators into our trading plan, and typically, these indicators can be used to help the objective trader to “filter” through the numerous opportunities the market has to offer and maybe even increase the odds of success.
I look at the filtration process like this: I know that I always want to be a buyer at or near demand (price support) and a seller at or near supply (price resistance). What I don’t want to do is to take trades at every supply and demand level, as this would greatly impact the overall risk exposure.
NEXT: Take Only the Best Trades and Skip the Rest
|pagebreak|Therefore, I can then apply a technical indicator as a filter for my numerous trade opportunities at supply and demand, which will enable me to take some entries and pass on others. Again, think of the indicator more like a decision-support tool.
Let’s look to an example. In the above 60-minute chart of EUR/JPY, we can see that on numerous occasions, price pulled back to demand levels at the same time as hitting or testing the 50-period exponential moving average (EMA), and also used the EMA as price resistance on March 4 when hitting supply at the same time.
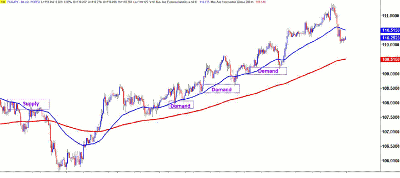
Click to Enlarge
Now, of course, there were times when price overshot the EMA, and also, during the last test of the EMA at demand around 110.50, the price blew through the level, but this can be expected, as not all trades will work every time.
Still, when faced with multiple trade opportunities to buy demand levels or sell supply levels, using the EMA along with levels is a great way to take fewer trades and focus only on the ones with greater odds for success.
In this next example, we are referencing a four-hour chart of the USD/CAD—an ideal time frame for our “set-and-forget” traders. This time, we have included the Stochastics oscillator using the standard default input settings:
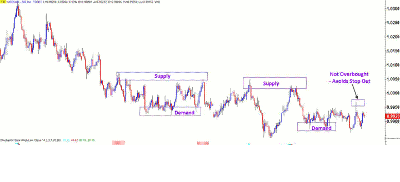
Click to Enlarge
In this example, there are many levels of price demand and supply, and the key is to not necessarily take every single one. Therefore, we have applied a Stochastics indicator and will only take a trade long or short when we have a corresponding oversold or overbought signal at the same time.
This way, we are again filtering though the multiple entries on offer and not taking every single one that comes up. We would have our levels in mind and then wait patiently for the green light to go once we have the appropriate signal from the indicator that the market has indeed reached a price extreme.
Again, I stress that not every single trade will work (that, unfortunately, is the nature of the game), but we are more importantly filtering through the charts for only the best trades on offer which provide the lowest risk and greatest potential rewards.
The last short opportunity around the 0.9950 area of supply would have been avoided as well because we never got the signal of overbought from the indicator, thus, the benefit of adding a filter not only adds probability to the success of trades, but can also help us to avoid one or two of the bad ones.
Time and time again, I meet traders who are struggling in the markets from day to day, mainly because they are getting overly confused with the vast number of tools, strategies, and aspects of technical indicators available to them. When I write these articles, I hope to help people demystify the process of trading and understand the aspects which are rarely spoken about in books and across the Web.
Trading should be simple and actionable. Relying on technical indicators to make decisions for you only leads us in the wrong direction. Think about these powerful tools as a means of filtering your trading opportunities only after having developed a consistent and disciplined rule-based strategy in the first place. Good luck, and get filtering!
By Sam Evans, trading instructor, Online Trading Academy